Goal Setting
Why should I use this form?
Use this form to define Goals for an appraisal calendar. The template that is mapped to the employee will be available in the Goal Setting form and it acts according to the Template Type, i.e.., whether Full Template, Blank, or Partial Template.
Employees can start defining Goals after getting the Goal Setting notification (this is done using the scheduler “PMS Mail Scheduler”).
Note: If there are any new employees joined after the execution of the “PMS Mail Scheduler”, in order to include them also in the appraisal process, execute the “PMS New Employees Mail Scheduler” scheduler. This is for including new joinees and employees who have been missed out while scheduling Goal Setting process. For example, if PMS scheduler has been initiated on 20th of Jan 2011 and if there are new joinees on 21st Jan 2011, who also need to be part of PMS process, then this scheduler helps in scheduling the process for the new employees.
What are the pre-requisites?
· Appraisal Calendar with Review Details should be available
· Template should be created and mapped
· Goal Setting notification should have been sent.
Who can access this form?
This form shall be visible to all employees to whom the visibility is given in Product Setup ® Module Role Mapping/Module Administration.
How to navigate to this form?
Point to PMS menu, select Goal Setting under Goal Setting Process.
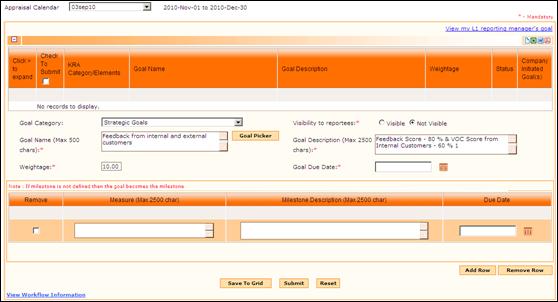
Goal Setting with Blank Template
The above screen shot refers to Goal Setting with Blank Template. Here the employee can add any Goals.
1. Select the Appraisal Calendar. Selected Appraisal Calendar’s period will be shown in the form.
2. If any Goal exists for the selected Appraisal Calendar, they will be populated in the grid.
3. Select if the Goals defined here will be visible to your reportees or not. If this option is set as ‘Yes’, then the Goal Setting form of your reportees will have a link ‘View my L1 Reporting Manager’s Goal’, on clicking, the Goals will be displayed.
Note: This option will be available only if the ‘Goals Visibility to reportees’ option in Appraisal Calendar is selected as ‘Yes’. Otherwise, this option will not be available in this form.
4. Click the [Goal Picker] button to select Goals. On clicking this button, the Goal Picker window appears, as shown below:

5. Double-click the Goal to select the Goal.
6. Goal Description, Weightage of the selected Goal is populated in the respective fields. It is also possible to modify, if required.
7. Select the Due Date for the Goal.
8. Enter Target Name, Target Description and Time of Completion of the Target.
9. Click [Add Row] to add more Target.
Goal Setting with Full Template
In case the employee is mapped with Full Template, then the message “You have been mapped with pre-defined Goals. Goal setting will not be applicable” appears in the form.
Goal Setting with Partial Template
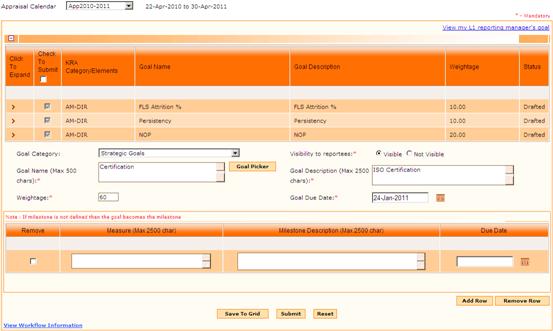
In case the employee is mapped with Partial Template, then few Goals will be already available for the employee with status ‘Drafted’, as shown in the above screenshot. It is possible for the employee to add more Goals.
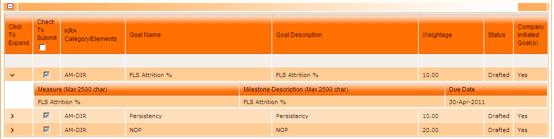
Click > to expand the Goal and see the milestones attached with the Goal.
10. After entering the Goals, click [Save to Grid] to save the Goals, which will be available for editing/submission.
11. Click [Reset] to refresh the form.
All the saved Goals are shown in the grid. Now the status of GOAL will be shown as ‘Saved’.
To submit a Goal,
12. Select the Goal by clicking the check box and click [Submit].
13. Click [Reset] to refresh the form. Now the status of Goal will be shown as ‘Pending’.