![]()
The login id accepts the mentioned special characters also.
(-, _ , \ , . , ‘)
Employee Creation
Why should I use this form?
This form facilitates the creation of a new employment record for new employees. This record includes information such as Login ID, Employee No., Grade, Job Title, Reporting to, etc.. Induction Test Template and Induction activities can also be assigned in this form. This form will include a Grid where the candidates whose Offer Acceptance has been recorded by HR will be listed. On selecting a candidate record the relevant details will be automatically populated in the Employee Creation Form.
This form also facilitates creating a new employment record for candidates on adhoc basis, i.e candidates who do not come through the Recruitment system.
If the candidate comes through the system (selected from the grid) then except few fields, all other fields are automatically populated in the form. Otherwise, you need to enter all details for the employee.
When an employee comes through the recruitment system flow, he/she can view his/her own Offer document through Personal Data -> Personal -> Others tab.
Note:
· If the candidate’s offer status is ‘Not Wanted’ or ‘Put on Hold’ then, the candidate will not be available in Employee Creation form.
· If the candidate’s Medical Status is ‘Unfit for Employment’ then, the candidate will not be available in Employee Creation form.
What are the Pre-requisites?
The following masters should be available:
· OU
· Designation
· Grade
· Department
· Location
· City
· Country
· Region
· Calendar
· Position
· Pay Group
· Compensation Template
Who can access this form?
This form shall be visible to Role Players who are mapped in the Recruitment Process Setup (Recruitment ® Erec Master) form.
How to navigate to this form?
Point to Recruitment menu, select Employee Creation under Candidate Selection.
This form has a Grid where the candidates whose Offer Acceptance has been recorded by HRFAC will be listed. On selecting a candidate record, the relevant details will be automatically populated in the Employee Creation Form.
This form also facilitates creating a new employment record for candidates on adhoc basis, i.e candidates who do not come through the Recruitment system.
If the candidate comes through the system (selected from the grid) then except few fields, all other fields are automatically populated in the form. Otherwise, you need to enter all details for the employee.
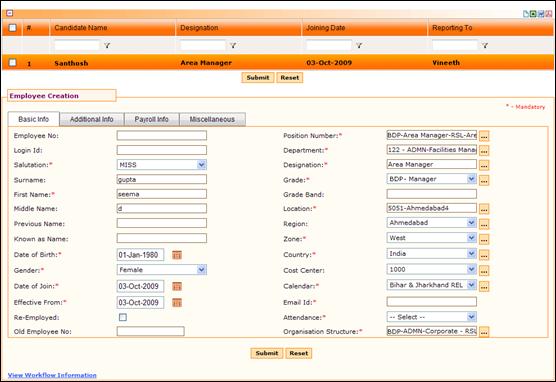
1. Enter the Employee No.
9. Note: If this is left blank, system will automatically generate employee number, upon approval of the form.
2. Entered employee no. will be displayed in Login ID. It is possible to change the ID.
|
The login id accepts the mentioned special characters also. (-, _ , \ , . , ‘) |
3. Select Salutation of the employee.
4. Enter Surname of the employee.
5. Enter First Name of the employee.
6. Enter Middle Name of the employee.
7. Enter Previous Name of the employee, if any.
8. Known as Name shows the First Name, by default. It is possible to change.
9. Select the Date of Birth of the employee.
10. Select the Gender of the employee.
11. Select the Date of Joining of the employee.
12. Select the Effective From date. This is the date from when the employment details will be in effect.
13. Select Re-employed to indicate whether the employee is re-employed.
14. Enter the Old Employee Number of the employee. This option will be enabled only if the ‘Re-Employed’ option is selected.
15. Select the Position Number for the employee, by clicking the ellipse button.
Note: On selecting the Position Number, the Department, Designation, Grade, and Organization Structure which are applicable to the selected position will be populated. It is also possible to change these values.
16. Select the Department of the employee by clicking the ellipse button.
17. Select the Designation of the employee, by clicking the ellipse button.
18. Select the Grade of the employee, or by clicking the ellipse button.
19. Grade Band will be displayed based on the selected Grade.
20. Select the Location of the employee by clicking the ellipse button.
Note: On selecting the Location, the Region, Zone, Country to which the selected Location is mapped, will be populated. It is also possible to change these values.
21. Select the Region, either by selecting from the drop down field, or by clicking the ellipse button.
22. Select the Zone, either by selecting from the drop down field, or by clicking the ellipse button.
23. Select the Country, either by selecting from the drop down field, or by clicking the ellipse button.
24. Select the Cost Center either by selecting from the drop down field, or by clicking the ellipse button.
25. Select the Calendar for the employee. If Calendar mapping is available (under Admin -> Calendar Mapping) for the combination of selected OU, Location, Grade and Region, then the Calendar drop down will select the mapped calendar, by default. Otherwise, no calendars will be selected by default. Holiday, weekly off, etc., are based only on the selection of calendar.
|
This is based on the configuration settings. If the value of configuration name ‘IS_NEW_CAL’ is set as ‘Y’, then the calendar will be selected based on the combination of OU, Location, Grade and Region. If the value is set as ‘N’, then no calendar will be selected by default. The user has to select the Calendar. |
26. Enter Email Id of the employee.
27. Select the Attendance option for the employee.
· Desk - Allows the employee to punch in/out from the office only and they will not be permitted to mark attendance from any other place. Whenever the employee logs into the system for the first time in the day, the system prompts them to sign-in and leaves a “sign-out” button.
· Internet/Home - Allows the employee to sign in/out from any location outside the office. This is for employees who travel frequently and are on the field most of the time. Whenever the employee logs into the system for the first time in the day, the system prompts them to sign-in and leaves a “sign-out” button.
· Security Card – Allows the employees to mark attendance from the security gate only. This will be captured through access card/swipe-card systems. The system will not prompt for sign-in/out for such employees, whenever they log into the system.
· No - The employees will not be prompted for attendance whenever they login to the system. The Line Manager captures the absent details for such employees.
28. Click the ellipse button and select the Organisation Structure to which the employee will be mapped.
Click Additional Info tab to proceed.
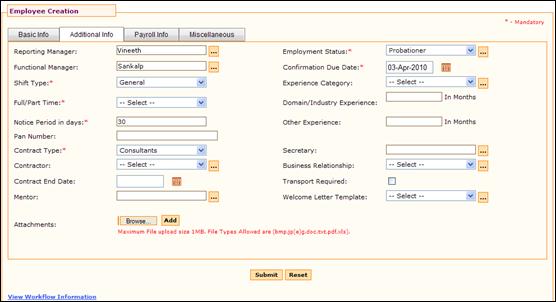
29. Select the Reporting Manager to whom the new employee will be reporting, by clicking the ellipse button.
30. Select the Functional Manager of the employee, by clicking the ellipse button.
31. Select Shift Type.
32. Select Full/Part Time to specify whether the employee is a full time employee or part timer.
33. Enter the Notice Period for the employee.
34. Enter the PAN Number of the employee.
35. Select Contract Type of the employee.
36. Select Contractor. If the required Contractor is not displayed in the drop-down list, click the ellipse button to add a new contractor.
37. Select the Contract End Date.
38. Select the Mentor of the new employee.
39. Select the Employment Status of the employee.
40. Select the date when the employee is due for Confirmation.
· If the Employment Status is selected as ‘Probationer’ or ‘Trainee’ then the Confirmation Due Date will be shown as six months from the current date. It is also possible to change it, if required.
|
This is based on the configuration settings. If the value of configuration name ‘CONF_MONTH’ is set as ‘6’, then the Confirmation Due Date will be calculated as six months from current date. |
· If the Employment Status is selected as ‘Confirmed’ then the Confirmation Due Date will be shown as the current date. It is also possible to change it, if required.
41. Select the Experience Category of the employee on joining the organization, either by selecting from the drop down field, or by clicking the ellipse button.
42. Enter the domain/industry experience of the employee.
43. Enter the Other experience of the employee.
44. Select Secretary of the employee by, clicking the ellipse button.
45. Select the Business Relationship, either by selecting from the drop down field, or by clicking the ellipse button. If the required Business Relationship is not available, then it can be added, by clicking the ellipse button.
46. Select the checkbox to indicate company Transport facility is required for the employee.
47. Select the Welcome letter template for the employee.
48. Click the [Browse] button to add any supporting document for the employee. On clicking the ‘Browse’ button, the ‘File Open’ dialog box appears, allowing selecting the file to be uploaded. Multiple files can be uploaded by clicking the [Add] button. Attached files are shown as below:

To remove any attached document, click the delete button
[![]() ] against the file name.
] against the file name.
Click Payroll Info tab to proceed.
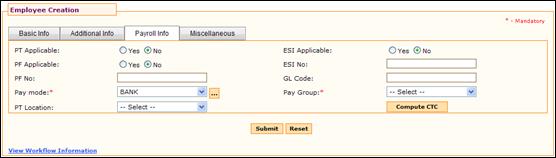
49. Select if Professional Tax (PT) is applicable for the employee.
50. Select if Provident Fund (PF) is applicable for the employee.
51. Enter PF Number
52. Select the Pay Mode.
53. Select the Professional Tax location.
54. Select if the ESI is applicable for the employee.
55. Enter the ESI Number
56. Enter GL Code
57. Click [Compute CTC] to compute the CTC of the employee. The CTC Template form appears, as shown:
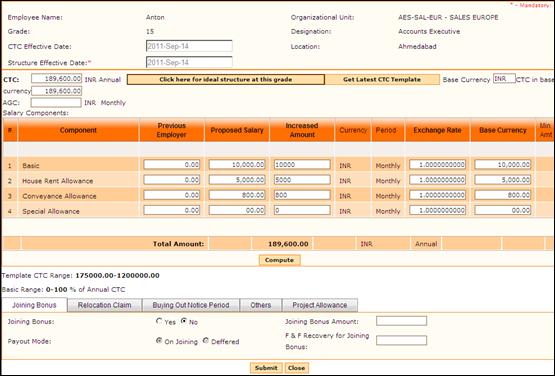
Candidate’s Name, Grade, Effective From, Unit, Designation, Location are displayed. CTC Effective Date and Structure Effective date shows the employee effective date (Effective From date in Basic info tab).
· Enter CTC Amount and click [Click here for ideal structure at this grade]. If value of certain components is changed (ex. Basic) and computed, then all the dependable formula components alone would be recalculated (Flexi components will remain unchanged).
· Click [Get Latest CTC Template] to reload the Fixed Component values from the CTC Template form. This will load with ideal values populated for all fixed components (if given in the CTC template). Click of ‘Compute’ button will calculate all Formulae components afresh.
· [Compute] – On click of this button, the system will re-calculate all Formula components (except flexi) and retaining the current values of the Fixed and Flexi components.
· Enter Basic Amount.
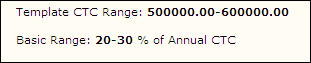
Note: The CTC Range and Basic range are shown in the form for reference.
· After entering the Basic amount, click the [Compute] button to compute other components. If there is any mismatch in the basic amount entered then system shows alert message as shown here:
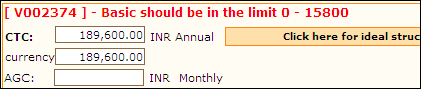
If the validation is successful, then other components are calculated based on the formula as set in the CTC template.
· Joining Bonus - Option to specify if the Joining Bonus is allowed or not. If this option is selected as “yes’, then the Joining Bonus Amount can be entered in the form.

· Joining Bonus Amount – Enter the joining bonus amount.
Note: This field will be available only if the ‘Joining Bonus’ field is selected as ‘Yes’.
· Payout Mode – On Joining or Deferred.
· On Joining – If this option is selected, then the joining bonus will be paid to the employee on joining the organization.
· Deferred – If this option selected, then the payout will happen in the specified periods.
· Months – enter the month from the date of joining for the payout.
· Percentage – specify the percentage of amount to be paid from this period.
· Amount – amount will be calculated by the system as ‘Joining Bonus Amount * Percentage’. For example, if the joining bonus is entered as Rs. 5,000 and the percentage is entered as 5%, then the amount field will show ‘250’.
· Relocation Claim - Option to specify if the Relocation claim is allowed or not.

· Relocation Claim Amount – Enter the Relocation Claim amount.
Note: This field will be available only if the ‘Relocation Claim’ option is selected as ‘Yes’.
· Buying out Notice Period - Option to specify if notice period can be bought.

· Buying out Days – Enter the number of days which can be bought.
Note: This field will be available only if the ‘Buying out Notice Period’ field is selected as ‘Yes’.
· Others

· Guaranteed Bonus Specified Period - Option to specify if bonus is guaranteed upon completion of specified period.
· Guaranteed Bonus Specified Amount – Enter the guaranteed bonus amount that will be paid upon completion of a specified period.
· Guaranteed Bonus Probation Period - Option to specify if bonus is guaranteed upon completion of probation period.
· Guaranteed Bonus Specified Period – Enter the period (in months) on completion of which the guaranteed bonus will be paid to the employee.
· Guaranteed Bonus Probation Amount – Enter the Bonus amount that will be paid upon completion of probation period.
Note: This field will be available only if the ‘Guaranteed Bonus Probation period’ field is selected as ‘Yes’.
· Project Allowance – Option to specify the allowance that will be paid to the employee in the selected periodicity.

· Select Project Allowance Amount, Periodicity, and choose the Effective From date.
58. Click [Submit] to save the details and close the window.
59. The Pay Group for the selected CTC Template will be shown in the field.
60. Click [Submit] to save the details. Upon submission, it will be sent for approval.
61. Click [Reset] to refresh the form.
Post Activity
If no employee ID is given during Employee Creation, the employee ID will be created automatically upon approval of the same.