Manage Role Player
You can control access to Adrenalin through responsibilities or roles that you create and assign to users of the system. Users can sign on to Adrenalin only through the responsibilities or roles you give them. So their responsibilities or role, control what they can see and do in the system.
A responsibility or role always includes a security profile defined through data access rights in Manage Role Player and a menu structure. It may also include a security group.
Security profiles determine the organizations, positions, location, grade, city, region, department, designation and payrolls or pay groups whose applicant and employee records responsibility holders can access.
Menu structures and functions control:
the particular windows/screens a responsibility holder can access
whether he or she can perform data entry, change or deletion on these windows/screens
![]() This
form is used to assign users to various roles or responsibilities. The
role mapping is done on the basis of OU/Location/Grade/Region/Position/City/Department/Designation/Pay
Group.
This
form is used to assign users to various roles or responsibilities. The
role mapping is done on the basis of OU/Location/Grade/Region/Position/City/Department/Designation/Pay
Group.
The parameters for which the role player has to be defined can be set in the Adrenalin Configuration Editor form for the configuration name ‘MAND_PARAM’. For example, if an organization wants to assign responsibilities based on organization, location and grade only and everything else is not applicable, the above configuration parameter will be helpful in defining the same.
Why should I use this form?
This option allows you to assign users to various roles.
What are the Pre-requisites?
OU, Location, Grade, Region, City, Department, Position, Pay group and Designation for which the role player has to be defined should be defined in Setup Masters. For example, if you want to define role player for a Location, then that Location should be available.
Who can access this form?
This form shall be visible to all employees to whom the visibility is given in Product Setup ® Module Role Mapping/Module Administration.
How to navigate to this form?
Point to Admin menu, select Manage Role Player under Product Setup.
![]()


![]()
![]()
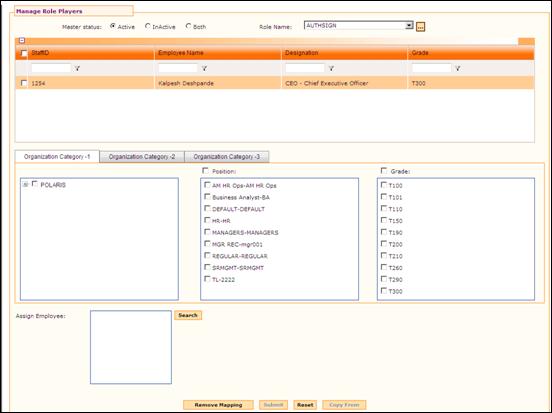
Figure 3‑7 Manage Role Player – OU, Location, Grade
This form has three sections. One is for filtering records based on the status.
· Active – Role players mapped to the active OU/Position/Grade/Region/City/ Location/Department/Designation/Pay Group are shown in the grid.
· Inactive – Role players mapped to inactive OU/Position/Grade/Region/City/ Location/Department/Designation/Pay Group are shown in the grid.
Role Name – Select the Role Name from the drop down field. Employees mapped for the selected Role are shown in the grid.
Click the ellipse button to add/edit Role names.
Organization Category - 1 tab
This tab shows the list of OU, Position and Grade. Select the check box to choose required OU, Position and Grade. Clicking the parent check box at the top of each section will select all the available items in the section. For example, if the parent check box ‘Position’ is selected, then all the available Positions will get selected.
Organization Category - 2 tab
This tab shows the list of Region, City and Location. Select the check box to choose required Region, City, and Location. Clicking the parent check box at the top of each section will select all the available items in the section. For example, if the parent check box ‘City’ is selected, then all the available Cities will get selected.
Organization Category - 3 tab
This tab shows the list of Department, Designation and Pay Group. Select the check box to choose required Department, Designation and Pay Group. Clicking the parent check box at the top of each section will select all the available items in the section. For example, if the parent check box ‘Designation’ is selected, then all the available Designations will get selected.
Note: If the MAND_PARAM is set as ‘0’ for any parameter, then that section will be disabled. Refer the screenshot below:

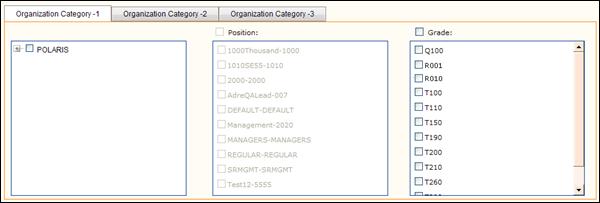
In the screenshot shown here, the Position is made as ‘0’, which means that the Position is not applicable for defining a role player.
To add map an employee to a Role,
1. Select the Role from the drop down field.
2. Select the required parameters (OU, Position, Grade, Region, City, Location, Department, Designation, Pay Group).
3. Click [Search]
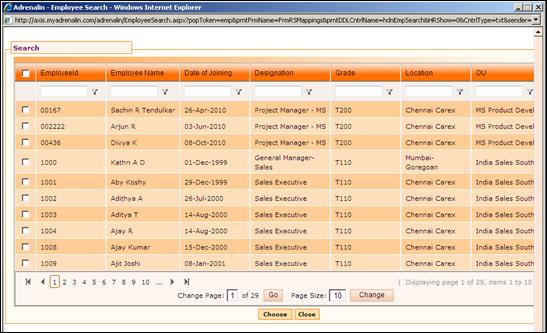
Figure 3‑8 Employee Search
4. Select the employee and click [Choose] to select that particular employee. Selected employees appear in the Assign Employees field.
Click [Submit] to save the details.
Click [Reset] to refresh the form.